Wednesday, December 25, 2013

How to Hide Pictures and Catalogs with Android Map Storage

1. Operate SD card with ES file browser or other file manager. Create a new file and named it ".nomedia". Copy the file and then open the file folders that have program data in one by one. Paste ".nomedia" respectively into these file-folders so as to skip the scan of these files when you launch map storage.
2. Go to file folders of "sdcard/android/data", delete the file folder "com.cooliris.media". Launch map storage again and you will see what has changed.

Note:
1. Remember to delete ".nomedia", or the entire SD card file will not been scanned (This may result in the empty map storage)
2. Not to place your DCIM folder or your folder you store your pictures in this file folder.

There's another way for you: To exclude manually the display catalog. (If it is possible for your map storage)
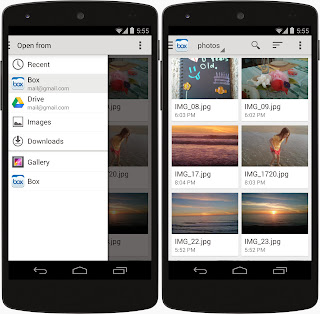
Click to enter map storage, you will see all the file folder in your map storage, just tick all you don't like it to be displayed.

Hide Pictures and Catalogs with Android Map Storage

Monday, December 16, 2013

Samsung is preparing for the two-sided transparent display

Russia manufacturer release a two-sided screen phone—YotaPhone. According to the latest news, Samsung two-sided transparent will come to us quickly, and, it is worth mentioning that the two-sided screen phone of Samsung is transparent which YotaPhone don’t have.
Nowadays, a new patent of Samsung is found on the Internet. The patent is about a new smartphone which designed as a transparent screen which you can operate it by touching the screen on both two side.
According to the patent, Samsung phone will enable us to launch the app or play the video without blocking our view. Moreover, the screen will be designed to more than one layer. You can move and place the aim file into the certain layer that you want.
Samsung Company focuses a lot on their screen. Therefore, they put curved screen into practice and Galaxy Round came to us. This transparent screen phone will not to be put into the market in such a short time, but it is the developing tendency of Samsung phone in the future. Besides, since Samsung has now got the patent of this transparent screen, I am sure two-sided transparent Galaxy phone will come to us before long.


Tuesday, December 10, 2013

Chrome for Android Update with New Gestures

Good news for all Android users, Google has released an updated version of Chrome for Android recently. More new features are developed, especially much more gestures comes to use in the new version.

Users can switch tabs quickly by swiping horizontally across the top toolbar. Also, you are allowed to enter the tab switch interface just dragging vertically down from the toolbar. It makes it more convenient for Android Chrome users to turn to and view all active tabs fast. Besides, dragging down from the menu option will help you open the menu and let you choose the item you want without even lifting your fingers. In addition, the new version has improved its start-up performance and stability. It speeds up your browsing times and provides "visual indication" when you scroll to the bottom of the webpage, which allows you to create shortcuts on your home screen as you like.

Desktop version of Chrome also updates with some new characters. Users are able to enjoy the function "Search Google for this image" only with a right click on the image of the webpage, or just tap and hold on the picture until the option pops up.

According to Google, the new version is not open to all users for the moment. It will go public from this week in different areas. You can know more details and check for updates in Google Play.

Monday, December 2, 2013

Working with Continuous Shots in HTC Sync Manager

If you have taken pictures using continuous shooting mode, you can import them to HTC Sync Manager from your phone. You can change the cover photo for numerous continuous shots. Or you can pick out only one shot that you like best to keep and delete the other shots.
To work with continuous shots, you need to obey the following instruction:
1. Double-click the album with the continuous shots you synced from your phone in it in ALBUMS or TIME view.
2. Click the thumbnail that has the icon on it, and then click .
3. Click . A thumbnail strip showing the series of shots comes to you.
4. Browse the shots and select one that you like best.
5. Click one of these icons above the thumbnail strip:
Click to set it as the new cover photo.
Click to keep your selected shot and delete the other.

HTC Sync Manager can help you work with continuous shots in your phone. With continuous shot, you can take many photos in a short time. You won’t miss any moment in your wonderful life with continuous shot. You can select the best photo that you like and delete the other photos.

Monday, November 18, 2013

Viewing Photos and Videos in HTC Sync Manager

You can arrange the photo and videos in your album of your HTC phone freely. HTC Sync Manager can help you view photos and videos more easily. Now I will show you how to browse and view your computer's photos and videos that you have already imported to the HTC Sync Manager Gallery.
You just need to operate according to the following instruction:
1. Select ‘Gallery’ in HTC Sync Manager.
2. To browse by album (folder), click ‘ALBUMS’, or to browse by date click ‘TIME’.
3. To see photos and videos, double-click a thumbnail.
4. Clicknear ‘Sort by’ and choose how you want your photos and videos be arranged.
5. You can:
(1.) If you want to move your photos or videos to another album, select photos or videos, and then click.
(2.) Double-click a photo or video to have a larger view.

With HTC Sync Manager, you can add photos and videos in your phones and then browse them by album folder or by date. You can move them to another album. You can also see a larger view by double-click it. In short, you can operate it as you like.

Tuesday, November 12, 2013

Viewing HTC Zoe Photos in HTC Sync Manager

Except of playing music, edit photos, and so on, HTC Sync Manager can also help you view HTC Zoe photos. HTC Zoe photo is a series of shots and a short video of the moment you captured. You can view HTC Zoe™ photos that you've imported or synced to your computer from your phone in HTC Sync Manager. An HTC Zoe photo consists of a series of shots and a short video of the moment that you captured. The video will automatically play.
Now, I will show you the approach to view HTC Zoe photos in HTC Sync Manager. Read the instruction below carefully and you will get what you want to know:
1. Double-click the album with the HTC Zoe photo you want in it in ALBUMS or TIME view.

2. Double-click the thumbnail that has theicon on it. 


3. Clickto replay the video

HTC Zoe is one of the newest ideas of HTC Company. With HTC Zoe, you can take a series of photos in a short time so as to capture every moment of your life in your camera. When going hiking with your family or friends, you can use HTC Zoe to memorize your wonderful trip. You don’t need to worry that there is a passer-by in the photo. You can cope with the photo in HTC Sync Manager.

Sunday, November 3, 2013

Editing your photos in HTC Sync Manager

With HTC Sync Manager, you can edit your photos. For instant, you can do basic photo edits such as cropping and rotating. To crop your photos you can adjust the size of your photos. To rotate, you can change your photo in any angle you like.
It is quite simple to edit your photos in HTC Sync Manager. What you need to do is to follow the instructions below:
1. Double-click the album that contains the photos you want to edit in ALBUMS or TIME view.
2. Select one or more photos that you want to edit.
3. Click. A thumbnail strip will show you all the photos that you selected.
4. Click the first photo on the thumbnail strip. Choose what you want to arrange the photo.
 (1) If you want to see photo information:
Clickto see information like resolution, file format, and so on.
 (2) If you want to rotate the photo:
Clickor.
 (3) If you want to crop the photo:
  ①. Click, and then change the size of the crop frame or drag the crop frame to the part of the photo you want to crop. You can click Customize, and then select a preset photo size.
  ②. Select Apply.
5. Save your changes to the current photo before you move on to the next photo.
6. Save and edit the next photo after click OK.

HTC Sync Manager can help you edit your photo. For instant, you can rotate it, or you can crop it. You can browse it in a larger size. You can move and arrange it, etc. You can do whatever you want on your photos. HTC Sync is like an assistant to help you do what you like.

Wednesday, October 16, 2013

Playing music in HTC Sync Manager

Do you have a big collection of digital music on your computer? Enjoy listening to your favorite songs from HTC Sync Manager by managing your music library. Drag the progress bar slider to jump to any part of song. You can also pause, resume playback or repeat songs any time you like. HTC Sync Manager will give you an unforgettable feeling of listening music.

Let me show you how to play music in HTC Sync Manager. Follow the steps below carefully:
1. Select 'Music’ in HTC Sync.
2. Double-click a song to play it.
(1) Browse music in the list of category. Click 'LIBRARY'> . Select a category like album, genre, artist, or song.
(2) When you're in the category like album, artist, or genre, move the mouse over an album art. Click on the album 'art' to play songs of the same album, artist, or genre.
3. The button at the bottom of the screen can be used to pause, resume playback, repeat songs, and so on.

Creating a playlist
Next, I will show you the progress of creating a playlist. Playlist includes all the songs of your phone. You can select any songs you like or set it as a ringtone.
1. Click a song that you want to add to a new playlist from the Music library.
2. Click .Enter a name for the playlist, and then click OK.
3. To add more music, you can select other music that you like, click again. Then click the playlist name.
4. Select 'PLAYLIST', move the mouse over the playlist you created, and then click to play it.

With HTC Sync Manager, you will find it easier to play, pause, playback or repeat songs. You will be convenient by what HTC Sync Manager brings to us. You can select any song you like in the playlist of your phone by HTC Sync Manager. And add as many songs as you like so long as the storage is enough.

Monday, September 30, 2013

How to Restore Lost Contacts on Android Phone


Contacts could be very significant for every phone user. Once you delete your phone numbers accidentally, you will get very frustrated because it may be hard for you to find them back. Actually you don't have to ask your friends or clients for their contacts and type your phone lists one by one. Here we will offer you a quicker way to get back your contact data.

Android Contact Recovery or Android Contact Recovery (Mac) allows you to undelete and recover your phone numbers directly from your Android phone including but not limited to Samsung Galaxy, Sony, LG mobiles.

Steps to restore deleted contacts from an Android phone

Step 1. Install and run the Android Contact Recovery.
Step 2. Connect Android to computer and enable USB debugging.


Step 3. Scan your Android for lost phone lists.
Step 4. Preview and restore contacts on your phone.
The app enable you to mark those you want and selectively save them on your computer.
Now you have completed all the necessary steps to make the restoration. Are you clear enough about the progress? If not, please check more on Android Recovery.

Android user tips time: Sync and recover Android contacts with Google Account

These days you may get tired of losing contacts. Once operate your phone incorrectly, you are likely to delete your phone lists on Android unexpectedly. Besides some third party apps, what else can you do to prevent contacts loss? Google Account can be your good helper. Sync your phone list to Google Account. Then keep data synchronization whenever you modify your phone numbers. In this way, no matter you switch your phone, or wrongly erase number list, you can easily import and recover the original contacts to your mobile with ease.

Saturday, September 28, 2013

How to Retrieve Deleted Text Messages from Android

Are you obsessed with sending messages? Text messages are very popular among the young and some Android phone fans. Losing important texts could be disappointing when formatting their mobiles. Take it easy. The space of your lost data occupied is merely marked as blank and you can still get them back until new data overwrites them. How do you manage to do that? Android SMS Recovery will do you a favor.
Android SMS Recovery can help restore lost SMS and contacts directly from your Android device like Samsung, LG, Sony,Motorola and so on. What's more, it's 100% safe and no personal info leaking.

How to restore lost short messages on Android

After download and install the app on your PC, follow the four simple steps.
Step 1. Run the program and connect your Android to the computer.
Step 2. Enable USB Debugging.
Step 3. Scan and analyze your Android for text messages.
Step 4. Preview and Selectively Choose SMS to Recover.


With steps above, you are able to restore your wanted messages from Android. Hope this is helpful for you.

Using tips for Android user: Easily transfer SMS to computer for backup.

Now that you have restored your text messages on Android, immediately go to back up your essential SMS to your PC. Don't be careless any more. Without backing up every once in a while, you may lose your messages again in the future. To do backup with one click, Android Transfer do you a favor. It can transfer your SMS to computer for backup in a short time. What's more, this tool enables you to send messages in batch. I'm pretty impressed by its user friendly interface. Maybe it deserves a trial. 

Thursday, September 26, 2013

How to Recover Photos from Android Phone/Tablet

Doing backup from your Android may avoid data loss due to formatting or deleting by mistake. However, actually most Android users aren't accustom to backing up their photos on computer when taking pictures via their phone or tablet. On the contrary, photo deletion is common among mobile/tablet users. So what should we do when missing our precious pictures? Android Photo Recovery can do you a favor.
Android Photo Recovery can quickly help restore your pictures and images from Android phones and tablets. It's compatible with mainstream phone models of Samsung, HTC, LG, Sony, and Motorola.

How to retrieve deleted photos on Android device
Run the app you will see the following interface.


Step 1. Connect Android to computer.
Step 2. Enable USB debugging.
Step 3. Analyze the data on your Android with the app.
Step 4. Preview and check wanted file type. Then continue to click "Recover" to save on your computer.
The above four simple steps show you how the app help get back your deleted pictures and images from Android.

Relative information:
Google free ebook: Help take more wonderful photograph 

Well, there is no doubt that it's good news for every Android phone/tablet user, especially for photo lovers. Photographer Colby Brown offers a book for free on Google Play Store. The ebook tells about how to use Android phones or tablets to take more excellent photos. We all know that many Android phones like Sony, Samsung are equipped with high-definition Camera. It's wasteful if you don't make good use of Android phones/tablets to take photos. This ebook covers tips for photographing and shows you how to use apps for editing pictures. Get it and enjoy your photo world!
If you possess Android Photo Recovery, you will no longer lose your excellent photos on your Android phones/tablets.

Wednesday, September 25, 2013

How to Set Up and Sync Google Account on Android?


Many a Android mobiles don't set Google Account as a default application these days. As a useful Google service, Google Account deserves praise and many users are still using it. For a new user of Android, do you know how to Set Up and Sync Google Account on your device? Now pay attention.
There are two ways to create Google Account, including via PC and setting up directly on your phone. Now let me tell you the details.

Create via PC:
Step 1. Go and visite https://accounts.google.com/SignUp?continue=https%3A%2F%2Faccounts.google.com%2FManageAccount to start signing up your account.
Step 2. Fill in the information and create Google Account.

When you input your personal information, pay attention to these rules:
1.Leave your frequently used email address.
2.The password consists of no less than 8 characters, you must use the
combination of numbers and letters instead of common words.
3.Be sure to make verification.
After register, you can receive an email from Google Team. Please log in your email to activate your account. When all these steps complete, you will have a new Google Account then you can sync it on your Android phone.

Set up directly on Android:
Step 1.Activate "sync & accounts" before continuing.
Click "Menu" button on the mobile desktop and then tap "settings". Then you will find subcatalog "sync & accounts". Select and tick this one.
Step 2. Add an Google Account.
After step 1, you should click "add account". In this step, there are also some other accounts for you to choose. Directly select "Google Account", then you will see a note prompting you to create new account or log in the existing account. Tap "new" and continue.
Note: Usually a new user of Android will be guided by mobile once he or she get the new device. But if you skip that, you can also add account following the steps we offer.
Step 3. Input your personal information to create a new account.
The step is similar to creating account via PC. What you need to do next is to fill in your informations to complete register. Once successfully create an account, you can sync your contacts to google account and enjoy this wonderful google service.

Tuesday, September 24, 2013

How to Recover Files from Android SD Card

Many users have developed habits of saving precious photos or media on their Android devices. Unfortunately, it has become a common phenomenon that many people lost data from SD card due to accidentally formatting or other unknown reasons. What's worse, it can be very frustrating that you haven't back up your contents on your computer. Is all your data missing forever? Of course not. Some third party apps can scan your SD card and get back your SMS, contacts, videos, music, and other files safely and efficiently.

Android SD card Recovery stands out of these useful applicants. With the help of this program, you can preview and selectly save your missing resource on the PC. In addition, it's designed as an easy-to-handle tool, both for professionals and home users.

Easy steps to restore deleted contents from Android SD card
Step 1. Install and run the Android SD card Recovery. Connect your Android device to PC via USB.
Step 2. Set up Android to enable USB debugging.


Step 3. Start scanning your SD cards for lost data.
Step 4. Preview and recover contacts, messages, photos and video from storage card.
These are main steps to do data recovery. If you want to view more details about it, please view http://www.recovery-android.com/

Tips for Android user: Other ways to recover Android SD card data
Besides using Android SD Card Recovery, you can also recover your SD card data following the below suggestions.
Actually, if you have backed up your files on your computer before, you can copy your data directly from your computer. If you are a Samsung user, Samsung Kies is your best choice to transfer these resources. If use other Android phones like Motorola, LG, Sony or Nexus, Android Transfer can do you a favor.

Monday, September 23, 2013

How to Recover Data from Rooted Samsung Phone

Most people who own a wonderful Android phone may have such experience: you rooted your Android to manage your apps more efficiently but you lost your resource without backup. This will drive you mad because the lost files are really important for you. Don't worry. Actually the resources you lost are not missing forever. What you all need is a tool for fetching data out and them saving on the computer. Are you still feeling confused about how to restore contents from your rooted Samsung mobile? Now let Samsung Data Recovery help you.
Samsung Data Recovery is an effective app to get your files back. No matter what kinds of data you lost including music, videos, SMS or other contents, you can retrieve them with simple steps.

How to get back your contents from rooted Samsung
Step 1. Download and Run the Program on the Computer.
Step 2. Connect your Samsung to the PC and Enable USB Debugging.
Step 3. Scan for Deleted Contents on your Samsung.
Step 4. Preview, Check and Recover lost contents from Rooted Samsung.Tick those you want back and click "Recover" to save them on your computer.


Note: By this Samsung Data Recovery, you can easily do the recovery with one click. To import your recovered files back to your Samsung device, you can try our Android Transfer.

Extra tips for users: Avoid data loss when root your Samsung 

For many Samsung users, there are lots of benefits to root your phone. After rooting your device, you can use some extra awesome apps, better performance, or even full control over your phone's OS. However, make sure do not lose any important data when you root your Samsung. So how to avoid data loss? Firstly, back up all your contacts, messages, multimedia, app or other file types on your computer. Secondly, beware of error operation. Be sure to follow the correct way to root your Samsung. Or you will turn your phone into brick. This can not directly prevent data loss, but rooting your phone correctly will make it easier to recover files on your mobile. Thirdly, once deletion performs without backup, use data recovery tool immediately to restore before new files overwrites it. Samsung Data Recovery is strongly recommended.
If you have got any questions, please leave me comments.

Sunday, September 22, 2013

How to Recover Photos from Motorola Droid

Many people have such experience if you use Motorola Droid. You delete your files by mistake or lose all the files including some important pictures when you format your device. Actually, the lost photos are not really gone under such circumstances. It is possible for you to recover your deleted photos from your mobile. So how to get your valuable pictures saved on Motorola Droid back? Now follow our suggestions.
Android Photo Recovery is designed for recovering lost data from various devices. It features simple and user friendly interface and you need no technical skills to operate the app. With help of it, you can easily restore your deleted photos from Motorola Droid in just a few steps. Do you really feel regretful after removing your pictures? Stop worrying and try this app.

How to retrieve photos from Motorola Droid
Step 1 Install and run the app.
Step 2 Connect your Motorola Droid to PC. Select your mobile and tick "Scan Now".
Note: The button "Advance Scan" is used for customizing file types you want to scan.

Step 3 Preview lost photo and start the recovery. 
Make sure you follow the steps above strictly and you can restore your photos resource. As a matter of fact, other missed contents of your Motorola Droid can also be found if you use Android Photo Recovery.

More information: Details about New Motorola Droid

The Motorola Droid phone feels good in the hand. The phone loads photos quickly on graphical websites, which proves its excellent speed performance. General navigation deserves praise, too. In addition, Motorola's new Droid is equipped with a wonderful 10-megapixel camera, which enables users to take sharp photos or video. Are you a new Motorola Droid user? Is your phone Motorola Droid Ultra, Droid Maxx or Droid Mini? Enjoy your digital life with Motorola Droid.

Saturday, September 21, 2013

How to Rescue Lost Videos from Android

Videos resource have performed an significant role in our digital life. The majority of people who use Android phones may also be crazy about watching videos on mobile phones for Android provides users with excellent interface. However, once your favorite videos are deleted or formatted accidentally, you may feel confused and regretful. Do you know how to rescue them quickly? Do you want to safely get them back without any modification? Now, let me guide you.
Android Photo Recovery can be a good helper for you. It is a pretty useful digital recovery tool to rescue all the lost multimedia files. With the app, you will no longer get mad once you remove videos by mistake.You can recover your deleted videos in a short time by following just a few steps. Do you want your videos back? Why are you still waiting? Let's get started.

How to rescue videos from Android

Step 1.Launch the app. Select and tap on the option "Recover Photo, Audio, & Video".
Step 2. Connect your Android mobile to PC and start scanning. Select your mobile and click "Scan Now".
Note: Before scanning, you can select file format if you don't need to scan all the data.
Just go to "Advance Scan" to customize your file types.
Step 3. Preview and rescue videos from Android. Click "Recover".


Can you understand the 3 steps above? Only by these simple steps, you can rescue your favorite deleted videos from your Android mobile with Android Photo Recovery.

Android Users Tips : Three Ways to Protect Your Video on Android?
If you've got massive video resource on your Android phones, you had better follow our suggestions.
Firstly, be sure to lock your phone screen whenever you put it in your pocket. Android smartphone touch screen is sensitive, which brings great convenience to users but also makes it more possible to unexpectedly delete. So keeping your phone screen locked is essential for every Android users.
Secondly, back up your video file on your computer. No matter you are going to format your Android, or to root your phone, it's very important for you to do file backup on your PC. Actually it's better to develop a habit of backing up data every once in a while. If you have backed up your video before, you would not lose them anyway.
Thirdly, keep a recovery app for your Android. Once you have unexpectedly lost your video, you can use some third party apps to get them back. You have to choose a suitable one for your device. Android Photo Recovery or Android Data Recovery may be good choices. Besides video, if you also want to restore other data like contacts, messages, or office file types, Android Data Recovery will be better. 

Thursday, September 19, 2013

How to Recover Deleted Photos from HTC One

Released in 2012, HTC One was universally praised for its hardware design and powerful functions. Many people use HTC one and use it to take a lot of wonderful photos. However, sometimes users may remove these pictures accidentally. We have received some complaints from users that they have no idea about how to restore deleted files from HTC One. Now with Android Photo Recovery, you will stop complaining about this extraordinary phone.

Android Photo Recovery is one of the best android photo recovery software supporting nearly all android versions including HTC One. In addition, it can help restore photos from not only HTC One, but also other devices like external hard drives, digital camera and laptops. What's more, the app enable you to get your lost photos saved on HTC One back just in a few steps, unlike other complex professional software. Don't hesitate, just get started.

How to recover deleted photos from HTC One

Step 1 Install and run the software for ready.
Step 2 Connect your HTC One to the computer. Select your device model and click "Scan Now". Attention! If you don't need to scan all the data, click "Advance Scan".
Step 3 Preview and start recovering. Select the pictures you want and click "Recover".
Now are you clear? You can rescue your lost pictures with simple steps. Now try to get your photos files back with Android Photo Recovery.

More information for users: HTC One take better pictures with Zoe mode
When it comes to HTC One photos, you have to talk about Zoe mode, which enables user to take better pictures by simply operating. There is not much difference between taking pictures in Zoe mode and in regular mode. The way you take pictures, I mean. To activate the Zoe mode is you must press the Zoe button first, and hold the camera for about three seconds toward the intended shot. In addition, Zoe is also designed for better video highlights. Are you familiar with this wonderful function of HTC One? Enjoy it and take wonderful pictures!

Tuesday, September 17, 2013

How to Get Back Deleted Pictures and Songs on Android

Android mobile supports excellent touch screen which is user-friendly and responsive. However, this can cause new problems. For example, you may find yourself usually make some misoperation by accident and delete your pictures and songs. You may worry that these files on your Android device have been lost forever. Actually, don't be disappointed. Android Photo Recovery can do you a favor.

Android Photo Recovery is commonly used for retrieving missed contents on various Android  devices including Samsung, Sony, Nexus etc. Once you lost your photos and music by chance, you can get them back with simple steps. What's more, you can selectively restore your pictures and songs within several minutes.

How to restore lost photos and music on Android


Step 1. Install and run the software for preparation.


Step 2. Connect your Android mobile with PC. Then you need to select your mobile and click "Scan Now".Note: You can select file type according to your necessity before scanning the device. Click "Advance Scan" to choose your files.
Step 3. Preview and get pictures and songs back from Android. Click "Recover" button to begin getting your files back.
With these simple steps, you can restore your data back with Android Photo Recovery.

Note: Why pictures and songs are lost?

There are several reasons for users to lose their pictures and music files. Sometimes, forcefully adding data in the memory card can result in loss of photos and songs from memory card. If hard drive of your computer is virus infected, files in your memory card can also be damaged. What's more, factory resetting, formatting, flashing ROM may also erase your data. Dear users, remember to back up files on your PC as soon as you get back your deleted pictures and songs.

Are you clear enough? If not, you can view http://www.recovery-android.com/ for more information.

Monday, September 16, 2013

How to Recover Deleted Files from Samsung Tablet

These days Samsung's tablets are catching users' eyes with large display and fast response of touch screens user experience. However, people may meet such problems: You delete your files by accident when restore factory settings; you format your tab without back up any files. You may get mad for these files are really important for you. Do you get any idea about how to recover lost files? Don't worry. Just follow me.
Android Photo Recovery will help you. It is a Do-It-Yourself file recovery applicant enables you to get back your data lost due to corruption, deletion, or formatting. By making good use of this app, you can recover your lost files in a short time. What's more, you can selectively retrieve your contents like music or videos only. Now follow me.

How to restore lost data from Samsung Tablet

Step 1 Complete installation and launch the app.
Follow the official instructions to install the app and then run it on your PC, you will see a window below.


 Step 2 Connect your Samsung tab to the computer.
Step 3 Check lost files to restore.
Step 4 Start recovering. What you need to do is to click "Recover" then you can save the files on your computer. Keep waiting for a few minutes.

Good job! Now you have already completed all the steps and get your lost content back.

More information about Samsung tablet:

A Samsung tablet is a bigger, faster device that brings you excellent experience. It offers many of the same benefits as a laptop but without the bulk. They are affordable for common users. What's more, it provides a mass storage for all songs, videos, photos, apps, etc. The Galaxy Tab, which is extraordinarily designed by Samsung Company, should deserve your appreciation. Choosing Samsung tablet means you have chosen the right device. Have a Samsung tablet? Enjoy your wonderful digital life. What's more, let Android Photo Recovery be your helper!


How to format your Android phone?

Want to know how to format your Android mobile? As a new Android user, you may not be familiar with Android mobile using techniques like formatting your phone. However, sometimes it’s necessary for you to reset the device to make it run faster. Now let me show you how to make it.

Soft reset on Android:

Method 1 Restore factory settings.
First find “settings” on the main interface on you mobile. Click “settings”, “Backup & reset” < “Factory data reset”. Then you should follow the hints on your phone to complete the reset.


Method 2 Reset via instruction code. 
1)  Input *#7780#, an instruction code for resetting mobile. After that, click dial key to executive instruction. If you format your phone in this way, contacts, messages and history won’t be deleted.
2) or you can choose to input *#7370#. Then your phone will reboot automatically. When a note prompting “ Restore to factory settings?”, select “yes”. Then what you need to do next is to enter password and make affirmation.
If you soft reset your Android, you should quit the auto start apps like Screen Saver in advance. Note that if you install Chinese input method on your phone, you should delete the relevant files with Handy File. Otherwise you can’t soft reset your Android successfully.

Hard reset on Android:

Step 1. Turn Phone off
Step 2. Press and hold Volume up button then Press and hold Power button till a menu will come out "Android system recovery"
Step 3. Use the Volume button to scroll up and down and use the Camera button to select (click on).
Step 4. Scroll down to "Wipe data/factory reset" and click on it.
Step 5. Scroll down to "Yes -- delete all user data" and click on it.
Step 6. After "Data wipe complete", click on "reboot system now". Or you can hard reset your Android in recovery mode, but not all the Android phones can be reset in this way.
For Android mobiles with recovery mode and bootloader, enter recovery mode, then click“reset<yes”.

Note:
1 Please back up your important data on your mobile before formatting and make sure your phone battery is full during the whole progress.
2 Uninstall all the apps before reset, you must format your phone without “system error”.
3 Do not shut down your mobile or plug into electricity when formatting.
4 It’s better to choose soft reset. If you can’t soft reset your Android, try hard reset later.